How we used Geovonic Connect’s “HTTP Request Launcher” to add a permit note in ServiceNow without ever leaving the map
Wait… can you really update ServiceNow from a web map with zero custom UI code?
Absolutely. And it takes about twenty minutes to set up.
Why this matters (even if you don’t speak GIS)
If you’re a ServiceNow consultant or power-user, chances are you already automate incident creation, approvals, and task assignments all day long.
What you probably don’t have is a quick way to let field crews or planners inside ArcGIS push context straight back into your workflows.
That’s where Geovonic Connect for ArcGIS comes in. It plugs into any ArcGIS Experience Builder app and lets you wire a button to any REST endpoint – ServiceNow included. Result: the map stays the “single pane of glass” while your Now Platform remains the system of record.
The 5-minute integration
Below is the exact flow we demoed for a NYC restaurant permit:
-
User selects a business on the map.
-
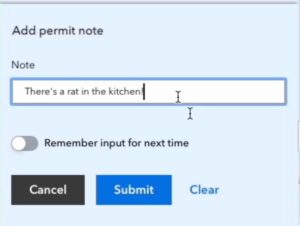
Clicks “Add permit note”.
-
Types the note (“Reports of vermin seen in restaurant”).
-
Presses Submit.
-
A Scripted REST API in ServiceNow creates a related note record and returns a success message.
-
Geovonic Connect pops the confirmation right inside the widget.
Step 1 – Build a tiny Scripted REST API in ServiceNow
Create a new Scripted REST API (no resources needed; we’ll keep everything in the “API script”).
Here’s the complete code we used:
Why it works
-
POST is quick and safe – no URL-encoded tricks.
-
The API accepts whatever Geovonic sends, validate the permitNumber, and create a child record.
-
Returning { message: “” } lets Connect show an instant toast (returning { url: “” } would redirect the browser instead).
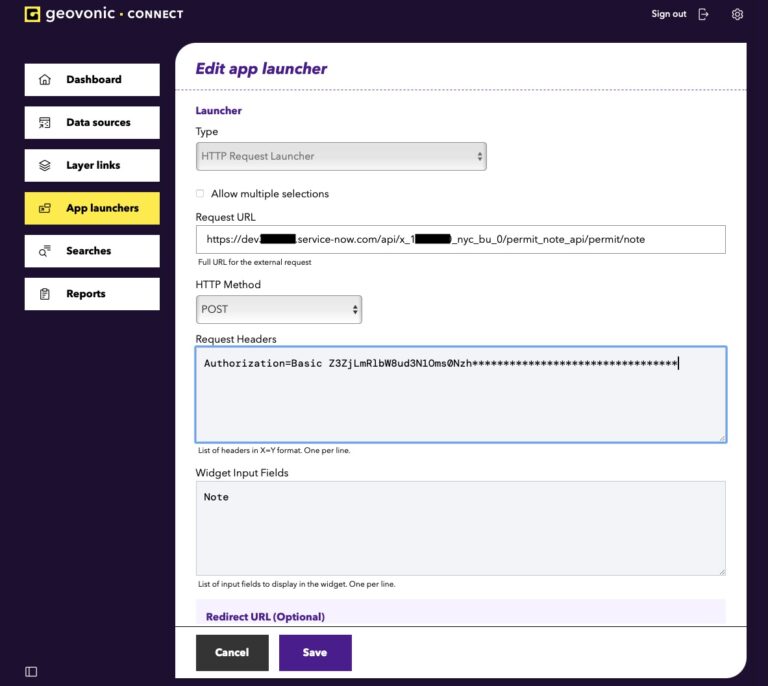
Step 2 – Configure the HTTP Request Launcher
Add a launcher that’s connected to an ArcGIS feature layer containing your establishments. The user will select an establishment when they want to add a permit note.
-
Request URL: your Scripted REST endpoint
-
Method: POST
-
Headers: Authorization=Basic Z3ZjLmRl… # Use your ServiceNow auth
-
Widget Input Fields: Just one called Note which will capture the user’s input
That’s literally it. Geovonic Connect will build the payload to send to ServiceNow.
Step 3 – Drop it into ArcGIS Experience Builder
Add the Geovonic Connect for ArcGIS widget into your Experience Builder app. Whenever your user clicks on an establishment they will see the option to add a permit note.
Where you can take it next
- Update an existing record (e.g. set status = “Resolved”).
- Chain workflows: return a URL that opens the freshly-created incident in Agent Workspace.
- Bulk actions: enable multi-select in Connect and loop over selectedFeatures on the Now side.
Ready to try it?
Geovonic Connect comes with a 60-day free trial. Spin up a dev ServiceNow instance, copy-paste the script above, and you’ll have a working prototype before your coffee gets cold.
What the JSON Payload looks like
When the user presses Submit, Geovonic Connect POSTs something like:
{
“selectedFeatures“: [
{ “id“: “NYC01014”, “attributes“: { “name“: “La Bella Pasta Bar”, … } }
],
“linkRecord“: {
“permitNumber“: “PER010001”
},
“widgetProperties“: {
“note“: “Reports of vermin seen in restaurant”
}
}
Response Contract
Your ServiceNow API should return any subset of these attributes:
{
“message“: “Successfully added the note to your permit”, // Displayed to the user on success
“url“: “https://go.somewhere.com/open/my/form”, // Geovonic Connect will open this URL in a new tab
“error“: “Your permit note could not be added” // Displayed to the user as an error message
}